

How To Make Paint Splatter In Photoshop Cs6
With Adobe Photoshop, you've got all the paint, brushes, and canvases required to create your own splatter pattern. Artists have fabricated a career out of expressing themselves with paint splatter but you don't need art galleries to try out the style yourself.
Photoshop fifty-fifty offers the ability to command the splatter, where yous can experiment with concentrated drips and drops, or permit loose like yous're flinging buckets of paint against a wall.
Hi there, In this article, we're going to explore paint splatter brushes.
We are going to learn how to make paint splatters in photoshop. We can take whatsoever Image equally background but in this tutorial, I am going to use a wall on which paint splatter will be applied. Allow's go in in that location and acquire how to do this now in Photoshop.
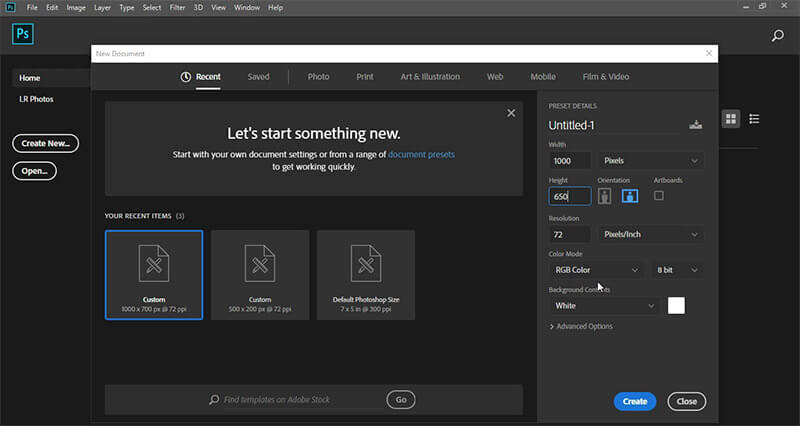
Creating New Document
Offset Photoshop.
Showtime, In Photoshop, become toFile > New. Name the document of your choice. Fix the file to the following dimensions:
⦁ Width to 1000 px
⦁ Height to 650 px
⦁ Orientation toLandscape
⦁ Resolution to 300 px or 72 px
⦁ Colour Way toRGB
And then click Create.
You tin choose your dimensions, orientation, and resolution, these values are but for this example document.
Importing Background Epitome
Now we have to import our groundwork image to canvas. In this case, I am going to import my wall epitome to the canvas by simply dragging and dropping.

Steps To Brand Paint Splatter
Pace 1:
Now afterward importing the background, we accept to make a new layer and proper noun it "Pigment Splatter" and put it to a higher place the background layer.

Footstep 2:
Now, Cheque the color showing in the Color Picker at the bottom of the tools section. To modify the color — which volition be the one terminal used — double-click the solid-colored box, choose a new color and click "OK."

Step three:
After choosing a color. Click the paintbrush tool. Click on Special Effect Brushes. Click i of the splatter castor heads, such as 29, 39, or 59.
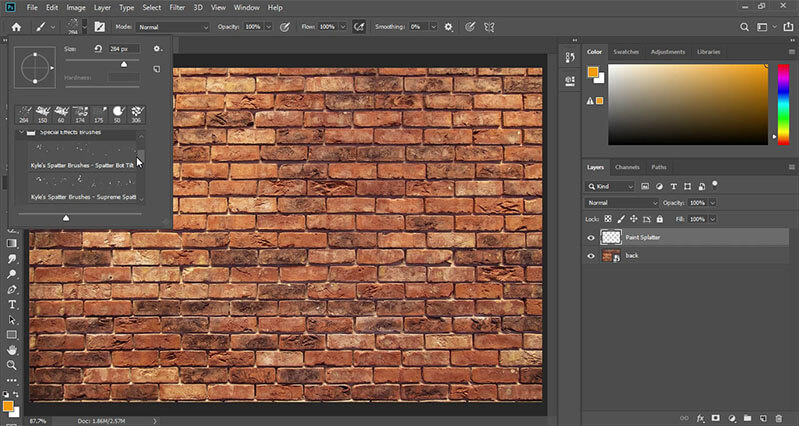
Step 4:
Slide the "Size" bar up or down — the larger the size, the larger the splatter.
Footstep 5:
Position the cursor over the canvas and notation the cursor now looks similar a splatter. Adjust the "Size" and brush head equally desired.
Stride half-dozen:
Click once on the sail to eolith a single splatter. Click and drag the cursor while holding down the left mouse button to eolith continuous splatter, equally if you were spray painting.

Step 7:
If we have to make multi-colored splatter. Switch colors in the Color Picker and continue clicking the sail for a multi-colored splatter effect.

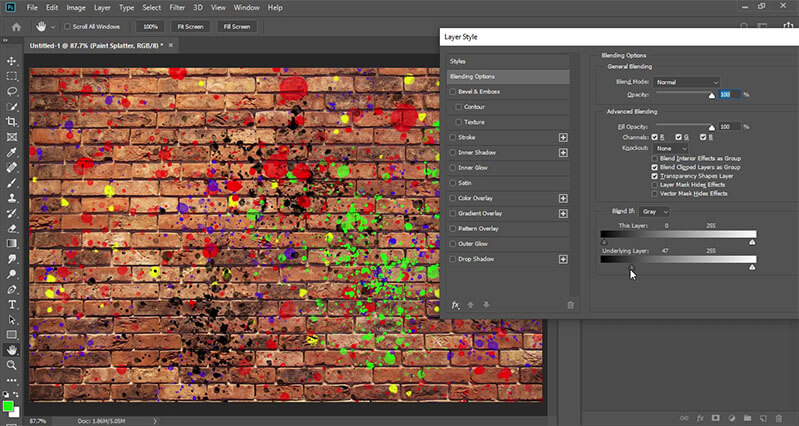
Step 8:
This looks already really overnice only we have to add some finishing touch to arrive look more than realistic.
So nosotros accept to select Pigment Splatter layer and go to Blending Option and in Blending Options Increase the value of Bullheaded If: Underlying Layer to around 50 to make shows visible of background on paint splatter to make it more realistic.
Conclusion:
Now we have our paint splatter on photoshop, yous can use it on any paradigm you desire.

Keep Learning:
How To Make Imprint Ad Or Affiche Blueprint For BillBoards Or Social Media Ads.
Watch Video For Some More Info:

I'thou a Graphic Designer with 5+ years of experience. Specialized in Adobe Photoshop.
Become Info Most Any Photoshop Editing, Photoshop Manipulation, Logo Design, Flyers, Business Carte, Cartoon Portrait and any type of piece of work-related to Graphic Design and Photoshop Editing.

How To Make Paint Splatter In Photoshop Cs6,
Source: https://www.hackgraphic.com/paint-splatter-in-photoshop/
Posted by: bursonmich1986.blogspot.com
0 Response to "How To Make Paint Splatter In Photoshop Cs6"
Post a Comment